a stray sheep

お仕事周りの雑記帳

wmi_exporterでCluster Shared Volumeのディスクサイズを監視する

概要

Hyper-Vクラスタ環境のCluster Shared VolumeをPrometheusで監視する。

  • PrometheusでCluster Shared Volumeのmetricsを取得して監視する
  • wmi_exporterのtextfile collectorを使用する
  • Cluster Shared Volumeのボリューム情報はpowershellを使って取得する
  • powershellスクリプトは、タスクスケジューラで1日1回実行する

ちなみに、wmi_exporterではローカルディスクのメトリクスを取得できるが、Cluster Shared Volumeのメトリクスは取得できない。

参考

以下を参考にしました。 github.com

要約すると、workaround として、スケジュールされたタスクと組み合わせてtextfile collectorを使って実現できる。

また、以下の投稿のpowershellスクリプトを参考にしました。

@jrcresawn you could try my own version, which I wrote a few days ago.

https://gist.github.com/basroovers/91c99d919cb0769b3d257692ed4ef99e

I'm running it via Task Scheduler but I rather have it started from wmi_exporter itself, the way Telegraf does it.

textfile collectorについて

textfile collectorについては、こちら github.com

  • 他の処理によって書かれたファイルから、メトリクスを作成する
  • デフォルトで有効なので、簡単に使える。
  • デフォルトでは、C:\Program Files\wmi_exporter\textfile_inputs\ フォルダ配下の.promファイルのみが読み取られる。
  • ファイルの場所は、--collector.textfile.directory オプションで指定可能
  • このtextfile_inputs フォルダは、wmi_exporterのインストール時に作成されている
  • .promファイルは、空の行で終わる必要がある。

環境

Powershellスクリプトの作成

要件

  • Cluster Shared Volumeのディスク容量情報をファイルに出力する
  • 使用率等を計算したいので、ボリュームのサイズと、空き容量をそれぞれ出力する

csv-to-prom.ps1

powershellの構文は、環境によって異なる。

# variables
$csv_size_promLocation = "C:\Program Files\wmi_exporter\textfile_inputs\csv_size.prom"
$csv_free_promLocation = "C:\Program Files\wmi_exporter\textfile_inputs\csv_free.prom"

Import-Module FailoverCluster

$clustername = Get-Cluster

$objs = @()
$CurrentFree = @{}

$csvs = Get-ClusterSharedVolume
foreach ( $csv in $csvs )
{
    $csvinfos = $csv | select -Property Name -ExpandProperty SharedVolumeInfo
    foreach ( $csvinfo in $csvinfos )
    {
        $obj = New-Object PSObject -Property @{
            Name = $csv.Name
            Path = $csvinfo.FriendlyVolumeName
            Size = $csvinfo.Partition.Size
            FreeSpace = $csvinfo.Partition.FreeSpace
            UsedSpace = $csvinfo.Partition.UsedSpace
            PercentFree = $csvinfo.Partition.PercentFree
        }
        $objs += $obj
    }
}

Set-Content -Path $csv_size_promLocation -Encoding Ascii -Value ""
Add-Content -Path $csv_size_promLocation -Encoding Ascii -Value "# HELP win_csv_disksize Clustered Shared Volume disk size. `n"
Add-Content -Path $csv_size_promLocation -Encoding Ascii -Value "# TYPE win_csv_disksize gauge `n"

Set-Content -Path $csv_free_promLocation -Encoding Ascii -Value ""
Add-Content -Path $csv_free_promLocation -Encoding Ascii -Value "# HELP win_csv_freespace Clustered Shared Volume disk size. `n"
Add-Content -Path $csv_free_promLocation -Encoding Ascii -Value "# TYPE win_csv_freespace gauge `n"

foreach ( $k in $objs) {
    Add-Content -Path $csv_size_promLocation -Encoding Ascii -Value "win_csv_disksize{name=""$($k.Name)""} $($k.Size)`n"
    Add-Content -Path $csv_free_promLocation -Encoding Ascii -Value "win_csv_freespace{name=""$($k.Name)""} $($k.FreeSpace)`n"
}

出力結果

csv_size.prom

# HELP win_csv_disksize Clustered Shared Volume disk size. 
# TYPE win_csv_disksize gauge
win_csv_disksize{name="volume1"} 2997416357888
win_csv_disksize{name="volume2"} 2997416357888
win_csv_disksize{name="volume3"} 2997416357888

csv_free.prom

# HELP win_csv_freespace Clustered Shared Volume free space. 
# TYPE win_csv_freespace gauge
win_csv_freespace{name="volume1"} 807385362432
win_csv_freespace{name="volume2"} 1439418380288
win_csv_freespace{name="volume3"} 3793255264256

wmi_exporterでの確認

C:\Program Files\wmi_exporter\textfile_inputs\フォルダに、.promファイルが生成されると、wmi_exporterのメトリクスが表示される。

win_csv_freespaceの場合

Element Value
win_csv_freespace{instance="Server01:9182", job="windows", name="volume1"} 807385362432
win_csv_freespace{instance="Server01:9182", job="windows", name="volume2"} 1439418380288
win_csv_freespace{instance="Server01:9182", job="windows", name="volume3"} 3793255264256

タスクスケジューラの登録

  1. タスクスケジューラを起動
  2. タスクスケジューラライブラリに、新規フォルダーを作成(OS標準のものと分けるために)
  3. タスクの作成
  4. [全般]タブ
    • 名前: csv-to-prom.ps1の実行
    • 説明:任意
    • 「ユーザーがログオンしているかどうかにかかわらず実行する」を選択
    • 「最上位の特権で実行する」をチェック
  5. [トリガー]タブ
    • 毎日、開始の日時と時刻(任意)
  6. [操作]タブ
  7. 実行するアカウントを入力

Grafanaでの表示

最終的に、以下のようなグラフを生成した。設定方法は、省略。

Volume Name Size Used Avail Usage
volume1 3.00TB 2.19TB 807.63GB 7.2%
volume2 3.00TB 1.56TB 1.44TB 52.0%
volume3 3.00TB 2.40TB 593.30GB 80.2%

このグラフは、以下のダッシュボード・テンプレートのグラフ「Disk Space Used Base(EXT4/XFS)」を参考に作成した。

grafana.com

以上

grok_exporterとExample

概要

grok_exporterを使ってみる

  • 対象のバージョンは、grok_exporter-1.0.0.RC3 (現時点の最新)
  • exampleで確認

grok_exporterとは?

  • 任意の非構造化ログデータから、Prometheusのメトリクスをエクスポートする
  • 非構造化ログデータをパースするのにGrokを使う

インストール

$ cd /opt/prometheus
$ sudo wget https://github.com/fstab/grok_exporter/releases/download/v1.0.0.RC3/grok_exporter-1.0.0.RC3.linux-amd64.zip
$ sudo unzip grok_exporter-1.0.0.RC3.linux-amd64.zip
$ sudo ln -s grok_exporter-1.0.0.RC3.linux-amd64 grok_exporter

フォルダの中身

grok_exporter //本体
example/   //grok_exporterを理解するためのサンプル
pattens/    //grokのパターンファイル置き場

example

このサンプルでは、サンプルログ example/exim-rejected-RCPT-examles.log をconfig.yml に従ってパースし、Prometheusのメトリクスにする。

設定ファイル

global:
    config_version: 3
input: 
    type: file
    path: ./example/exim-rejected-RCPT-examples.log
    readall: true
imports:
    - type: grok_patterns
       dir: ./patterns
grok_patterns:
    - 'EXIM_MESSAGE [a-zA-Z]*'
metrics:
    - type: counter
      name: exim_rejected_rcpt_total
      help: Total number of rejected recipients, partioned by error message
      match: '%{EXIM_DATE} %{EXIM_REMOTE_HOST} F=<%{EMAILADDRESS}> rejected RCPT <%{EMAILADDRESS}>: %{EXIM_MESSAGE:message}'
      labels:
          error_message: '{{.message}}'
          logfile: '{{base .logfile}}
server:
    protocol: http
    port: 9144

パラメータについてのさらっとした説明(恐らく)

  • input: -> readall:  trueはファイルの先頭から読み込む(検証、デバッグならこっち)、falseは新しい行から読む(運用ならこっち)
  • imports: 定義済みのgrok_patternsを使う場合。入れておけばいい。
  • grok_patterns: ここにカスタムのGROKパターン(正規表現)を直書きできる。patterns/ 配下にファイルを作ってそこに書いてもいい。
  • metrics: 読み込んだログ行を変数(メトリクス)に入れるところ
    • name: 変数名(メトリクス名)
    • match: ここが取りたいログの正規表現を作るところ。%{PATTERN: message} のようにすると、以降のlabelsで .message で呼び出せる
    • labels: メトリクス内のラベル
  • logfile: '{{base. logfile}} logifleは、GROKパターンに依存しないラベル変数でファイルのフルパスを表す。base はGoテンプレート関数でフルパスのうちファイル名を取り出すもの。いずれもマニュアルに書かれている。

match: について

match: '%{EXIM_DATE} %{EXIM_REMOTE_HOST} F=<%{EMAILADDRESS}> rejected RCPT <%{EMAILADDRESS}>: %{EXIM_MESSAGE:message}'
  • EXIM_DATE、EXIM_REMOTE_HOSTは、patterns/exim に定義されている
  • EMAILADDRESSは、patterns/grok_patterns に定義されている
  • EXIM_MESSAGEは、config.ymlのgrok_patterns に定義したもの

実行する

./grok_exporter -config example/config.yml

実行結果を確認する

http://localhost:9144/metrics にアクセスすると、以下のように表示される

exim_rejected_rcpt_total {error_message="Sender verify failed"} 2000
exim_rejected_rcpt_total {error_message="Unrouteable address"} 32
exim_rejected_rcpt_total {error_message="relay not permitted"} 165

Prometheusをサービス化する

概要

今後使っていくにあたって、Prometheusをサービス化する。 まだ、とりあえずの試運転。

雑誌やネットの記事を参考に、以下のようにする。

Promtheus本体

設計

場所 パス
prometheusのインストール場所 /opt/prometheus/current -> /opt/prometheus/prometheus-2.16.0.linux-amd64シンボリックリンク
設定ファイルの場所 /etc/prometheus/prometheus.yml
DBの保存場所 /var/db/prometheus

prometheus.service

$ sudo vi /usr/lib/systemd/system/prometheus.service

[Unit]
Description=Prometheus Server
Documentation=https://prometheus.io/docs/introduction/overview/
After=network-online.target

[Service]
ExecStart=/opt/prometheus/current/prometheus --config.file=/etc/prometheus/prometheus.yml --storage.tsdb.path=/var/db/prometheus
ExecStop=/bin/kill -TERM ${MAINPID}
ExecReload=/bin/kill -HUP ${MAINPID}

[Install]
WantedBy=multi-user.target


$ sudo systemctl daemon-reload
$ sudo systemctl enable prometheus
$ sudo systemctl start prometheus

Node_Exporter

設計

場所 パス
node_exporterのインストール場所 /opt/prometheus/node_exporter-> /opt/prometheus/node_exporter-0.18.1.linux-amd64シンボリックリンク

node_exporter.service

$ sudo vi /usr/lib/systemd/system/node_exporter.service

[Unit]
Description=Node Exporter

[Service]
ExecStart=/opt/prometheus/node_exporter/node_exporter

[Install]
WantedBy=multi-user.target


$ sudo systemctl daemon-reload
$ sudo systemctl enable node_exporter
$ sudo systemctl start node_exporter

参考

node_exporterのexampleに、systemdのサンプルファイルがありました。 https://github.com/prometheus/node_exporter/tree/master/examples/systemd

PrometheusでWindows機を監視する

概要

PrometheusでWindowsを監視する。

  • Windowsの監視には、WMI Exporterを使う。
    • WMI Exporterは、IISサイトやアプリケーション、ネットワークインタフェース、サービス、ローカルの温度などを監視できる(らしい)
  • 手元のホストのWindows10環境に入れる。つまり、ゲストのPrometheus本体から、ホストのWindows 10 Homeを監視するということ。

環境

  • 作業マシンはノートPC(Windows 10 Home)★今回の監視対象
    • wmi_exporter 0.9.0
  • Vagrant 2.2.5 + VirtualBox 5.2.8
  • VM1:Prometheus本体、CentOS7.7、Private NW: 192.168.33.10
    • prometheus 2.16.0

WMI Exporterのインストール

  1. WMI Exporterのサイトへアクセス github.com
  2. [releases]をクリックし、そこでインストーラを取得する。今回は、以下をダウンロード。
  3. インストーラを実行
  4. タスクマネージャを起動して、[wmi_exporter.exe]プロセスがいることを確認
  5. ブラウザで、http://localhost:9182/metrics にアクセスし、WMI Exporterでメトリクスを確認(ホストのノートPCに入れたのでそのまま見れる)

WMI ExporterとPrometheusを連携する

$ sudo vi prometheus.yml

   static_configs:
      - targets:
         - 'localhost9090'     // prometheus本体
         - '192.168.33.11:9100'   // vm2のnode exporter
         - '192.168.33.1:9182'    // ホストマシンのWMI Exporter

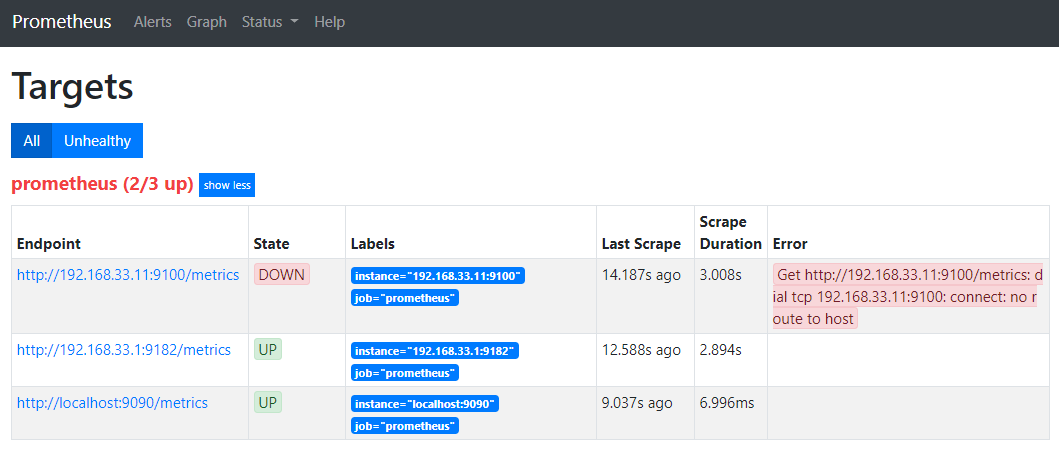
連携が成功すると、「http://localhost:9090」 の[Status]→[Targets]では、以下のように表示される。 1つ目は、停止中なので"DOWN"でok。2つ目がホストマシン。連携できているようだ。

f:id:belial6:20200226005501p:plain

Prometheus + Grafana

概要

前回、とりあえず動かせたPrometheusのインタフェースをGrafanaにしてみる。

  • Grafanaは、Prometheus本体があるサーバに入れる。
    • Grafana 6.6.2
  • Vagrantのポート転送で、ホストの3000ポートをゲストの3000ポートに転送するように設定しておく。(in Vagranfile)

Grafanaのインストール

Grafana公式を参考に実施 grafana.com

$ sudo vi /etc/yum.repos.d/grafana.repo

[grafana]
name=grafana
baseurl=https://packages.grafana.com/oss/rpm
repo_gpgcheck=1
enabled=1
gpgcheck=1
gpgkey=https://packages.grafana.com/gpg.key
sslverify=1
sslcacert=/etc/pki/tls/certs/ca-bundle.crt


$ sudo yum install -y grafana
$ rpm -qa | grep grafana
grafana-6.6.2-1.x86_64
$ sudo systemctl daemon-reload
$ sudo systemctl start grafana-server
$ sudo systemctl status grafana-server
$ sudo systemctl enable grafana-server.service

Grafana + Prometheusの連携

  1. ホスト上で、Grafanaに接続(http://localhost:3000/
  2. ログイン(admin/admin)
  3. [Add data source]をクリック
  4. [Prometheus]を選択
  5. URL欄に「http://localhost:9090」を入力
    • prometheusの本体がある場所。同じサーバ内なので「localhost
    • prometheusのポートが「9090」
  6. [Save & Test]をクリックし、「Data source is working」と表示されることを確認する
  7. [Home]→[Import dashboard]をクリック
  8. "Grafana.com Dashboard"欄に、テンプレートのIDを入力
    • 「1860」
  9. "Options" -> "Prometheus"で、「Prometheus」を選択し、「Import」をクリック
  10. Dashboardが表示され、Prometheusが収集したデータが表示される。

f:id:belial6:20200225234855p:plain

Subversionリポジトリの移行

概要

Subversionリポジトリの移行検証をローカル環境で行う。

TortoiseSVNのインストール

  1. TortoiseSVNの公式(https://tortoisesvn.net/)にアクセス
  2. [Downloads]タブ をクリック
  3. [TortoiseSVN 1.13.1 - 64-bit] をクリックして、ダウンロード
  4. インストーラを実行。すべてデフォルト値で進む。
  5. 完了

移行元リポジトリの作成

$ sudo svnadmin create /data/svn/repo1
$ sudo svn mkdir file:///data/svn/repo1/trunk file:///data/svn/repo1/tags file:///data/svn/repo1/branches -m 'Initial import'
$ sudo chown -R apache:apache /data/svn/repo1

チェックアウト

データの追加、コミット作業

移行先リポジトリの作成

$ sudo svnadmin create /data/svn/repo2
$ sudo svn mkdir file:///data/svn/repo2/trunk file:///data/svn/repo2/tags file:///data/svn/repo2/branches -m 'Initial import'
$ sudo chown -R apache:apache /data/svn/repo2

移行

// リポジトリデータをダンプ
$ sudo svnadmin dump /data/svn/repo1 > /tmp/svn_repo1.dump

// リポジトリデータを復元
$ sudo svnadmin load /data/svn/repo2 < /tmp/svn_repo1.dump

移行後の状態(http://localhost:10080/repos/repo2f:id:belial6:20200222171208p:plain

移行できました。

CentOS7 + Subversion + Apache

参考にしたサイト(すぐできました) web-technical.hatenablog.com

概要

Vagrant環境の準備

(1)Vagrantfile生成
> vagrant init centos/7

(2)Vagrantfileの編集(ポート転送設定)
config.vm.network "forwarded_port", guest:80 , host:10080

(3)VM作成&起動
> vagrant up
> vagrant ssh

構築作業

$ sudo yum install -y subversion mod_dav_svn httpd
$ svn --version
svn, version 1.7.14 (r1542130)

$ sudo mkdir -p /data/svn
$ sudo svnadmin create /data/svn/repo
$ sudo svn mkdir file:///data/svn/repo/trunk file:///data/svn/repo/tags file:///data/svn/repo/branches -m 'Initial import'

$ sudo chown -R apache:apache /data/svn

$ sudo vi /etc/httpd/conf.d/subversion.conf
<Location repos>
  DAV svn
  SVNParentPath /data/svn
</Location>

$ sudo systemctl enable httpd
$ sudo systemctl disable firewalld
$ sudo vi /etc/selinux/config
SELINUX=disabled

確認

ホストのブラウザを開いて「http://localhost:10080/repos/repo

表示されました^^

f:id:belial6:20200221011553p:plain